Pollution Hurts, even when you really don't know it is happening.
I went for a short hike in the Shenandoah National Park to the WhiteOak Falls. Although the falls were beautiful, I spotted something on the rock that looked VERY familiar. I found a naturally formed drill hole in Guyana on a waterfall called Jordan Falls. The only people to have been at Jordan Falls were a handful of locals, and a Chinese Survey team.
Here is the Naturally Formed Drill Hole from a Rock.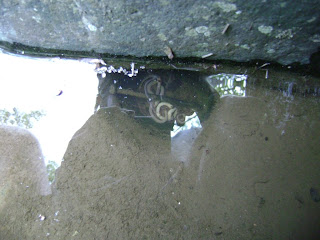
Here is what Pollution can do for a waterfall.
The waterfall picked up a nail, more than likely left behind MANY years ago, and it sat and drilled a hole into the rock surface of the falls. This is OLD pollution. How many years has this nail been here, drilling into the rock? Please follow the hiking rules, and DON'T POLLUTE. Even the smallest things can have large impacts well after you are gone. Pack out MORE than you Pack in.
About Me

- Vagabond Sean
- I am a traveler. I left my job, house, pets, career, business, and loved ones to travel the world and share it on my Website and Blogs.
Drop Your Cards Here


Wednesday, June 3, 2009
Pollution Hurts
Saturday, May 30, 2009
Aware Project by the Interactive Institute
AWARE is a design oriented research project that aims to increase people's awareness of how energy is being used in everyday life, especially in our home environment. The objectives are to develop strategies and artefacts that make people attentive of their energy use, as well as offer them control and possibilities of making their energy use more efficient.

The Aware project consists of six objects: a clock, light switch, chandelier, radiator handle and two lamp designs. The Laundry Lamp and Energy Aware Clock are currently on show as part of an exhibition called Visual Voltage at the House of Sweden in Washington.

The Aware Laundry Lamp (above) aims to encourage people to hang-dry their clothes as opposed to using a tumble dryer, one of the greatest consumers of energy in the home. Clothing hung on the frame diffuses the light and acts as a lamp shade.

The Aware Chandelier (above) explores the aesthetic qualities of compact fluorescent light bulbs.
The Energy Aware Clock displays household energy consumption in real-time and allows comparisons with the previous day’s consumption to be made through overlaid graphic visualisations. It also functions as an ordinary clock.

The Aware Puzzle Switch (above) is a household light switch that aims to encourage people to turn off lights by exploiting our “built-in desire for order”. The puzzle only appears complete when in the off position.
The Aware Handle is a radiator handle with teeth in the surface, designed to be more comfortable to use when decreasing temperature than increasing.The Share Aware Lights (top image) are a series of portable, radio-controlled lights which divide a fixed amount of energy between them. As one light is made brighter the other lights in the series dim to compensate.
Friday, May 29, 2009
How to Add Solar Power to Your Home
Adding solar power to your home does not have to be difficult, or expensive. By slowly adding in solar power to your home electrical system, you can slowly, and affordably convert your home to run from the power of the sun. Choosing appliances to convert first is a simple matter of figuring out which appliances you can benefit from having run on solar power.
1. Purchase a Watt -O- Meter
This little guy will tell you how much electricity each appliance or plug is using during the day, and can help you figure out what your power requirements are. 2-3 days to a week is a suggested time frame for your power usage survey per plug, so you can get an average usage over a few days time.
2. Purchase a solar array that is within your budget.
3. Purchase a Battery for Power Storage
The battery is the thing that will be supplying power to your appliance during the night when there is no sunlight. The battery (or battery bank) should be more than your daily Watt -O- Meter
value for amp hours.
4. Purchase a Sine Wave Converter (DC to AC Converter)
These can vary in price from cheap to expensive, but again, you should choose one that is within the Watt values you got from your Watt -O- Meter
.
5. Put it All Together
Mount the solar panels on your roof, balcony, or even in the backyard on the ground. Just make them stable and face them towards the South in Northern Hemisphere, & in the southern hemisphere, they should face North; with a tilt of 60% in the winter, and 30% in the summer for fixed installations. This page has some good suggestions for Optimum Orientation for Solar Panels.
6. Power it all Up
Connect the Solar Panel(s) to the Charge Controller and the Charge Controller to the Battery. Now connect the battery to the Inverter, and turn it on. If all is working fine, plug a small lamp into the Inverter, and turn it on. Your lamp should now be running on battery/solar power.
7. The Electrical Tie-In
From here, you can either re-route outlets, or whole circuits from your Electrical Panel Box to your Sine Wave Inverter, or you can run extension cords to the appropriate plugs (much more dangerous, but acceptable in short wire run situations.)
Check out how the Tales of a Vagabond Skoolie Bus Runs on Solar Power.
Complete with the small-scale solar layout described here.
Thursday, May 28, 2009
How to Start Recycling at Home
Recycling at home is very easy to start doing, but like any other change, you need to form the habit first. I am currently staying with my sister, who taught me how to recycle when we were kids. They live in a non-recycling community, so there is absolutely no draw to do any recycling other than your own good judgment and love for our Earth.
Step 1:
Acquire 3 Recycling Barrels
A trash barrel is not required, but since you will be throwing things into a bucket, a cheap barrel is the best option. I suggest using a small kitchen barrel that can be bought (or freecycled) for cheap. Place these barrels either outside on the porch, or in a completely opposite corner than the traditional trash barrel.
Label the barrels:
With a marker, paint, or other utensil, label the 3 barrels: Plastic, Metal, and Glass.
Step3:
Acquire a compost bin
A compost bin will further reduce the waste that comes from your house, by recycling food scraps (non meat/dairy) into fresh, fertilized soil. There are many compost bins out there now, so you do not have to settle for an enormous compost heap in the backyard. Some tumbling composters are small enough for an apartment balcony
Step 4: [The MOST Important One]
ACTUALLY RECYCLE!!!
You set yourself up with a nice little system, now use it. Stop anyone who goes near your traditional trash barrel, and let them know what you are doing. Within 3 times of using your new method, a habit will form, and you will be on your way to recycling the world.
Step 5:
Get rid of it
The trash men will know what to do with recycling if there is curb-side pickup where you are, but if not, the local dump has a recycling station at it. Look around. It's there.
Wednesday, May 27, 2009
US says Paint Roofs White for Energy Efficiency
US Energy Secretary Steven Chu said Tuesday the Obama administration wanted to paint roofs an energy-reflecting white, as he took part in a climate change symposium in London.
The Nobel laureate in physics called for a "new revolution" in energy generation to cut greenhouse gas emissions.
But he warned there was no silver bullet for tackling climate change, and said a range of measures should be introduced, including painting flat roofs white.
Making roads and roofs a paler colour could have the equivalent effect of taking every car in the world off the road for 11 years, Chu said.
Read the whole story here...
Converting a Diesel Engine to run Waste Vegetable Oil
People are becoming more aware that you can run Waste Vegetable Oil (WVO) in a traditional diesel engine. The original diesel designs allowed running on peanut oil. There is no guess as to why petroleum-based fuels became the primary fuel source. The Tales of a Vagabond site runs out of a 33' Skoolie Bus that has been converted to an energy efficient RV that is powered by WVO. The conversion was not very difficult, but it did require some engineering.
The Tales of a Vagabond WVO Skoolie Bus 
A look at the 'Guts' of the WVO conversion process.
The controls for the WVO are simply laid out as switches that control servos to specify which fuel the Vagabond Skoolie Bus needs. After starting the bus on traditional diesel fuel, the bus warms up to it's running temperature, and the warm coolant flows through the bus. An extra coolant pump is activated to ensure the long path is followed without obstruction. A switch controls which tank the WVO comes from, so judging by the gauges, a tank is selected. The fuel pump switch is flipped, and pressure is checked to ensure there were no problems in getting the WVO to the engine compartment. As long as everything goes smoothly to this point, we flip the Fuel Intake Switch to Veggie Power, and the Return Tank Switch to return fuel to the WVO tanks to make sure there is no excess WVO in the diesel tank.
The process to shut down the bus is almost exactly in reverse, except you have to switch the Fuel Intake and wait a bit longer to switch the bus back to diesel return as the Fuel Lines from the WVO tanks are longer than those of the diesel, so purging the lines is a longer process..
Learn more about the Tales Of a Vagabond Waste Vegetable Oil Powered Skoolie BusFollow the Tales of a Vagabond Blog to read stories from the everyday life of a Vagabond

Tuesday, May 26, 2009
A Solar Powered Bullet Train
 The first phase of this plan for a solar powered train will run from Phoenix to Tuscon, Arizona, and in the future, extending north to Grand Canyon and south to Nogales. Phase one is estimated to be running in 2018, at a cost of $27 Billion US Dollars. Designed by retired Civil Engineer, Bill Gaither and business partner Raymond Wright, they set up Solar Bullet LLC
The solar bullet train will run at 220MPH on four sets of tracks. The inner two tracks are an HOV lane of sorts, bringing commuters from Phoenix to Tuscon, a 116mile journey, in 30 minutes. The outer tracks would include more local stops, and increase the total time to one hour.
The train would require 110 megawatts of electricity and would operate with solar power generated from overhead panels. Gaither is looking to city officials at each of the intermediate stations and asking them to put up $5,000 toward the $35,000 needed for an economic and tax revenue analysis before the project moves forward.
Original Article Here
This is the array of solar panels that is used on the Vagabond Bus:
For an investment of under $500, you too can watch your power meter spin backwards. ;)
Living Clean and Green
Welcome to my newest blog with information, tips, and news about Living Clean and Green.
Other Green Blogs We Like

Make the World a Greener Place
